Thursday, September 4, 2008

Busy cutting stencils for embossing

I don't have any pics ... yet... but I have been cutting stencils to use for embossing. I don't have a Cuttlebug - just using the embossing stylus the old-fashioned way.

I have done two sizes of dots for the swiss dots effect. Also cut out a paper chain of a boy and a girl. Forget where I found the pattern but it was made available for cutting out so I made an .svg file and cut out the stencil of that too. I did a couple of ornate corners - Victorian style. LOVE these! I tried to do a honeycomb pattern with a hexagon but it isn't showing enough detail. May have to try putting them closer together as well as the bees don't leave spaces in their honeycomb!!


I finally pulled out my pasta maker to try embossing with. Will be playing with that later. I discovered that there are two CUT settings on the pasta maker! Lo and behold, my pasta maker doubles as a SHREDDER!!
Thought I would try cutting some tissue paper later and see if it makes a nice fluffy 'nesting' type of effect for packing in gift bags as a filler.

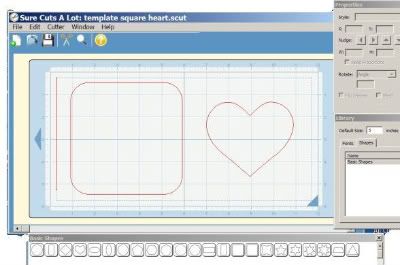
I will be putting together another tutorial on how to make a Word Book using just SCAL. I've started playing more with the tools in SCAL and am discovering lots of tricks (which I'll share of course).

Was supposed to go for an ultrasound today at 7:30 am... and being the night hawk that I am, I stayed up late and SLEPT IN! missed that appointment! Will have to call and book another appointment.


Oh, something else I tried today.... I used my watercolor crayons on a dry babywipe and wetted it to blend the colors. When it was dry I modge-podged it onto a piece of cardstock and let it dry again. THEN I tried cutting it in my Cricut and it actually worked!!! It would have been a perfect cut but the darn mat was starting to go unsticky at that precise moment and the little piece of cardstock moved a bit. I could see that part of it did cut right through. Makes a nice fabric look. I'll post pics later of that too.

I broke down and bought a SECOND accordion style briefcase for all my paper supplies. Looks like I'll be scrapping a LOONNNNGGGG time with all the paper I have! Got to get to my Paper Hoarders Anonymous meetings again! LOL

Toodles for now,

Marly

Tuesday, September 2, 2008

Brainstormed last night and came up with this idea!


Well, I had thought I would have some eloquent introduction/greeting to my Blog but ended up coming up with this idea last night and just had to share!

Ever want to cut a shape out of a photo? Like a heart or a flower around someone's face? Well, this idea just came to me last night w
hile trying to prepare a bulletin board display for work. This is how you can do this technique!

First, select your basic shapes option in SCAL or select your preferred shape from the endless dingbat fonts out there. Size
your shape the way you want it.

IMPORTANT!! SAVE AS .SCUT FILE

It is important to save if you need to cut another template later. You also have to have this .scut file open to cut the matching shape from the photo.

So next you are going to cut your template from clear colored acetate (I simply used a report cover that I cut 6" wide to fit mat.)


Using the Zig 2way glue pen, squiggle some lines around the edge of the cut out shape as below. Note: you can use repositional adhesives of any sort for this, I just prefer the Zig because with the spray adhesives you always have overspray and that sticky film gets on EVERYTHING!!


Smooth out the glue to an even coating (use edge of scrap CS paper as a smoother). Allow the glue to dry/cure to achieve tackiness.

Once the glue has cured, select a photo to cut and place the template on top to select the area of the photo you want to cut out. As you can see in this pic I wanted to have the full dolphins beak to be in the picture.


Once you have your cut area selected, lift up template WITH the photo stuck on back and place on cutting mat EXACTLY on the border of the cut area.


In this next pic you see you have to remove the template. Because one hand was holding the camera, I couldn't demonstrate that I hold down the photo while peeling off the template. You will have to do that so that the photo doesn't move.


Now, into the Cricut it goes... being careful to line up the mat feed like you always do.


Cut your photo shape, remove mat and peel off excess paper...


And this is the finished result, notice the dolphins' beaks were cut pretty close to the area I selected in the template.


While this isn't an exact science, it is the closest I could come to cutting a selected area out. The possibilities are endless. If you are patient enough to keep switching the blade for the Cricut markers, you could draw an outline around your shape first, then switch to blade and cut it. My head is spinning right now. I better finish up this first entry and post a link on the SCAL site in the Tutorials board.

Would love to see if any of you readers try this and OF COURSE want to see the results! If you post them on the SCAL forum I'll see them!

Remember .... SCAL ROCKS!!

Toodleloo from Marly